Before inserting user into LDAP, we must understand why we have to have user in the first place. The reason on why we have to have user is because this user will be used as admin user for OID-OAM integration.
When creating a user, the attributes and the objectclass should be added. After, we can then proceed to adding a user into OID.
Creating the Attributes Interface - Schema > Attributes > Create new LDAP Attributes Type
When creating the attributes, this is the interface that will pop-up on the screen. you can fill in the necessary values in.
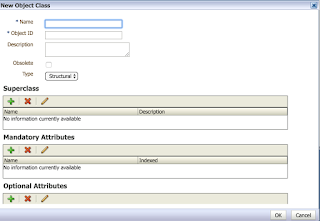
Creating the ObjectClass Interface - Schema > Object Classes > Create new LDAP Object Classes Type
This is the interface when creating an Object class. The purpose of an object class is to group the attributes together into one. For example, attributes can be "name" and "email", and the object class can be name as "Personal Information".
So far, i can only manage to add the attributes and the object classes using ODSM (Oracle Directory Service Manager) and cannot be added through java.
Once the attributes and the objectclass has been added, we can use java to add the user.
1) First in order to create a user you must connect to the ODMS. You must provide the IP Address, username and the password in order to connect.
i.e
Hashtable<String, Object> env = new Hashtable<String, Object>(11);
env.put(Context.INITIAL_CONTEXT_FACTORY, "com.sun.jndi.ldap.LdapCtxFactory");
env.put(Context.PROVIDER_URL, "ldap://10.0.63.96:3060");
env.put(Context.SECURITY_AUTHENTICATION, "simple");
env.put(Context.SECURITY_PRINCIPAL, "cn=orcladmin");
env.put(Context.SECURITY_CREDENTIALS, "TelkomSDP2017");
InitialDirContext ctx = new InitialDirContext(env);
2) Afterward, we have to create an object "BasicAttributes" in order to create a multiple of attributes.
BasicAttributes attrs = new BasicAttributes();
3) We then proceed to add the object class.
i.e
Attribute classes = new BasicAttribute("objectclass");
classes.add("personinfo");
4) After that, add the objectClass attributes to the attributes
i.e
attrs.put(classes);
5) Store the other attributes in the attribute set
i.e
attrs.put("cn", "test");
attrs.put("namaexample", "nostra");
attrs.put("emailexample", "nostra@nostra.com");
6) Add the new entry to the directory server, this will add the user in and also with the attributes and the object class
i.e
ctx.createSubcontext("ldap://10.0.63.96:3060/cn=ariexample,cn=Users,dc=telkom,dc=co,dc=id", attrs);
System.out.println("User has successfully been created");
RESULT:
The two result shows 3 different type of output.
1)

The 1st output come out from using apache directory studio
2)

The 2nd output comes from using the ODMS, by using this it shows all the values and their attributes.
3)

The 3rd option is by using java. here are steps on how to display the user using java output
1) First in order to display the user you must connect to the ODMS. You must provide the IP Address, username and the password in order to connect.
i.e
Hashtable<String, Object> env = new Hashtable<String, Object>(11);
env.put(Context.INITIAL_CONTEXT_FACTORY, "com.sun.jndi.ldap.LdapCtxFactory");
env.put(Context.PROVIDER_URL, "ldap://10.0.63.96:3060");
env.put(Context.SECURITY_AUTHENTICATION, "simple");
env.put(Context.SECURITY_PRINCIPAL, "cn=orcladmin");
env.put(Context.SECURITY_CREDENTIALS, "TelkomSDP2017");
2) we then have to define which user that would like to be shown.
i.e
DirContext context = new InitialDirContext(env);
Attributes attributes = context.getAttributes("cn=ariexample,cn=Users,dc=telkom,dc=co,dc=id");
displayAttributes(attributes);
3) Afterwards, we get all the attributes and their values from the user and display in the output console.
i.e
public static void displayAttributes(Attributes attributes) {
if (attributes != null) {
try {
for (NamingEnumeration e = attributes.getAll(); e.hasMore();) {
Attribute attr = (Attribute) e.next();
System.out.println("Attribute name: " + attr.getID());
for (NamingEnumeration n = attr.getAll(); n.hasMore();
System.out.println("value: " + n.next()));
}
} catch (NamingException e) {
e.printStackTrace();
}
}
}


